HW2 - Drawing Shapes
Logistics
This assignment is due on Wednesday Jan 21st at 10pm. As with all assignments, you will have the opportunity to revise this assignment based on the feedback that you get.
You will submit four files to Gradescope: checkers_pieces.py, picture.py, picture.png, and readme.txt
Collaboration policy
For this assignment, you may work alone or with a partner, but you must type up all of the code yourself. (It is therefore unexpected for two code submissions to be completely identical.) You may have at most one partner for the entire assignment.
You may also discuss the assignment at a high level with other students. You can discuss the assignment with Anya, our prefect, or any course staff.
You should list any student or course staff with whom you discussed the assignment (you don’t have to include prefect sessions), and the manner of discussion (high level, partner, etc.) in comments at the top of your source code files.
If you work alone, you should say so instead.
Note: Remember, you should not be using search engines or generative AI when completing your assignments (this includes the Copilot extension in VS Code!). You can, however, search within the official Python documentation: https://docs.python.org/3/.
Getting started
Both parts of this assignment will require you to use the graphics.py library and canvasvg.py. You should download a copy from here and here and save them both in the same folder as your assignment code.
Goals
The primary goal for this assignment is to give you practice working with the graphics.py library. You will additionally get practice writing loops, working with objects, and working on bigger programs.
Assessment
The core requirements are:
checkers_pieces.pycorrectly generates the image described below- Header with at least five lines that start with
#for each file - Basic style that can be checked automatically (not complete!)
- Collaboration statement at the top of each file (even if it just says that you worked alone)
- A
readme.txtthat includes your reflection (detailed below)
The advanced requirements are:
- Satisfy the core requirements
picture.pyfollows the requirements:- At least three different shapes used (different classes)
- Setting at least three attributes
- Requiring at least five user clicks
- A
picture.pngis included as an example interaction - Descriptive headers for all files
- Descriptive variable names that follow
snake_case - Good line grouping and spacing (i.e. use blank newlines to group your lines of code)
Setup
I recommend that you complete this assignment in Olin 310.
Mount the COURSES drive and remember to save everything into STUWORK. If you don’t do this, everything you write will disappear when you log out!!!!
- Create a new folder in your STUWORK called
HW2 - Open your
HW2folder in VSCode - Create two files
checkers_pieces.py, andpicture.py.
If you really want to use your personal machine, check HW1 for instruction links.
Parts of this assignment:
Comments and collaboration
As with all assignments in this course, you are expected to provide top-level comments (lines that start with # at the top of the file) on any .py source code files with your name and a collaboration statement. For this assignment, you have multiple programs; each needs a similar prelude.
You need a collaboration statement, even if just to say that you worked alone.
Here is an example of how you can start a file:
# File: picture.py
# Purpose: Draws shapes based on user clicks.
# Author: Lulu Amert
#
# Collaboration statement:
# - Milo: partner (worked on code together)
# - Hobbes: discussed how to use a mouse click
# - Mal (Course Staff): how to make a Circle
Here is another example:
# File: checkers_pieces.py
# Purpose: Draws one checkers piece per row in a random column.
# Author: Hobbes Amert
#
# Collaboration statement: I worked alone.
#
# Inputs:
#   * n: size of grid (int)
Gemini Bot
We’ll be continuing the experiment of custom chatbots. Here is the one for homework 2. As a reminder, if you use this, I would appreciate you copying some example interactions with it to a text document and uploading that to Gradescope along with your submission. This is both to give me an idea of whether it is providing correct information and if it is actually being helpful. If you manage to get it to produce solutions or otherwise inappropriate responses, please let me know asap so that I can prevent it from undermining everyone’s learning further.
Core: Checkers
For this part, you will display a grid representing a game board (like in checkers or chess, but you don’t need to color the grid locations red/black). You will be placing pieces such that there is one piece per row in random columns. What follows is details on how to achieve that end goal.
Drawing a grid
You will need a grid. This section details how to do that more easily. To make it easier to calculate placement of your grid and pieces, you should use the setCoords method of the GraphWin class to change the coordinate system to one you’re likely more familiar with.
You can use coordinates you’re more familiar with by using the setCoords method of the GraphWin class. To use this method, you should provide, in order, the minimum x, minimum y, maximum x, and maximum y values of the window.
Here is a snippet of code that uses a modified coordinate system to generate a grid. Note that setCoords is called with buffers of 0.5 on each side.
from graphics import *
import canvasvg

# Make the window
win = GraphWin("A Grid!", 400, 300)
win.setCoords(-0.5, -0.5, 4.5, 3.5)   # set the min/max coords, with buffer

# Draw some vertical lines
x = 0
y1 = 0
y2 = 3
line = Line(Point(x, y1), Point(x, y2))
line.draw(win)

x = 1
y1 = 0
y2 = 3
line = Line(Point(x, y1), Point(x, y2))
line.draw(win)

# TODO: add more lines (wouldn't a loop be great?)

# Draw some horizontal lines
x1 = 0
x2 = 4
y = 0
line = Line(Point(x1, y), Point(x2, y))
line.draw(win)

# TODO: add more lines

# Add some helpful labels
blLabel = Text(Point(0, -0.2), "(0,0)")
blLabel.draw(win)

brLabel = Text(Point(4, -0.2), "(4,0)")
brLabel.draw(win)

ulLabel = Text(Point(0, 3.2), "(0,3)")
ulLabel.draw(win)

urLabel = Text(Point(4, 3.2), "(4,3)")
urLabel.draw(win)

# Save the picture and then close
canvasvg.saveall("Checkers.svg", win)
win.close()
What you should do
For this part, your program should first ask the user in the Terminal how many grid cells there are (let’s call this n), and then draw an nxn grid. For each row, you should draw a red circle in a random column. A radius of 0.35 times a grid cell size seems to look good. You can get a random integer like so:
import random    #imports the random library

val = random.randrange(10)    # integer from 0 to 9 inclusive
print(val)                    # gave me 7 when I tested
Save your program in a file called checkers_pieces.py. Make sure to include the lines related to canvasvg to allow for saving your image and displaying it on Gradescope.
Here is a possible output:

Advanced: Picture
In this part, you will guide the user through making a picture. For example, your program could instruct a user to make a house by following these steps:
- Click twice, indicating two corners of a rectangle for the house.
- Click once, indicating the center point of the top edge of the door, which has width 1/5 that of the entire house.
- Click once, indicating the center point of a circular window that has diameter half the width of the door.
- Click once, indicating the peak of the roof. An example interaction might be the following sequence:
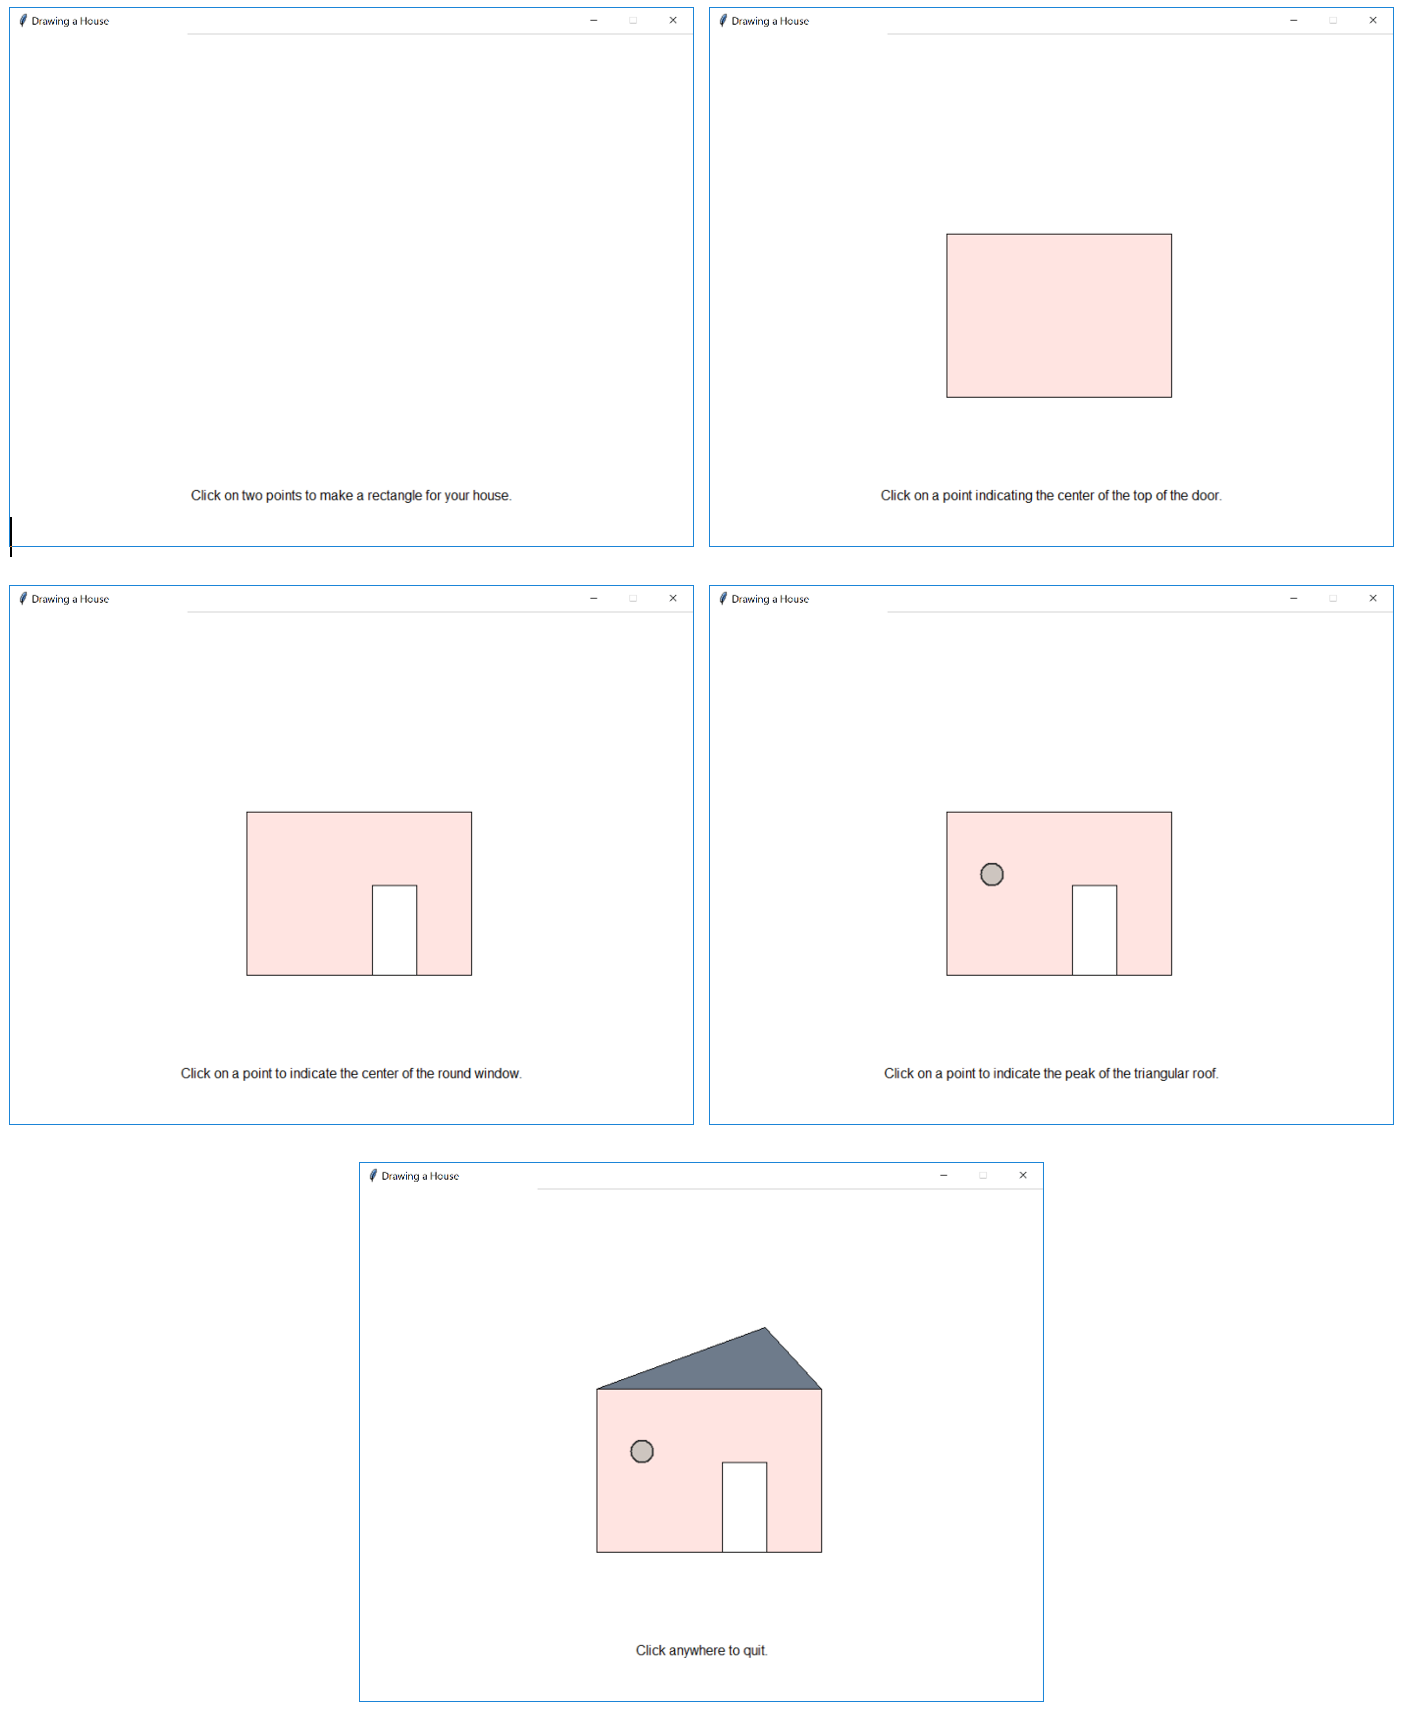
There should also be a text display at the bottom of the window, explaining the different steps to the user.
You can design any type of picture you want, as long as it follows these guidelines:
- There must be at least three different shapes used (different classes in
graphics.py). - You must set at least three attributes between all of the shapes (ex: fill color, outline color, border width).
- You must require at least five clicks from the user.
Your code should be saved in a file called picture.py. You should also include a screenshot of an example of your final picture after running your program in picture.png.
There isn’t an autograder or displayer for this part since there is so much variability in what you could submit, so a human grader will download and run your code to check for functionality.
Reflection
Were there any particular issues or challenges you dealt with in completing this assignment? How long did you spend on this assignment? Write a brief discussion (a sentence or two is fine) in your readme.txt file.
Here are some examples:
##### Reflection #####
# I couldn't figure out how to change the text for picture; I found the undraw() function in the graphics.py documentation PDF.
# I had issues drawing circles until I looked back at the sample code.
# I kept randomly choosing rows instead of columns.
# I spent 7 hours on this assignment.
##### Reflection #####
# I had so much fun making my own picture.
# Most of my trouble came from checkers.  I couldn't figure out how to draw the circles in the middle,
# and then I realized I had to add 0.5 to move them off of the lines.
# I spent 7 hours on this assignment.
##### Reflection #####
# It went fine; I found what I needed in my notes and the graphics.py documentation.
# I spent 5 hours on this assignment.
Submission
You should submit your files through the Gradescope link on Moodle for this assignment. You are able to upload them all to Gradescope, at which point the autograder will run and let you know if your code works correctly. You are able to submit your code as many times as you wish before the deadline to fix any issues. If you have questions about what the autograder is telling you is wrong, please ask!
Acknowledgements
This homework is from Prof. Tanya Amert.