Cellular Automata Lab
Goals
To get your computers set up for the course and investigate a cellular automata.
Setup
VSCode
You are likely already familiar with VSCode. You should download it if you don’t already have it.
Laptop Setup
(Note this guide is heavily based on Prof. Jeff Ondich’s)
Unix is a family of operating systems and both Linux and macOS are Unix-based. You’ve likely already been using Unix a lot if you have used the lab computers at all since they run macOS. Today’s goal is to get you setup with a Unix system on your own laptop.
macOS
Mac comes with the Terminal app (in Applications/Utilities) where you can work with a Unix command line. However, VSCode comes with the same Terminal, so it’s usually nicest to just use that (Terminal->New Terminal).
Linux
If you are running Linux, you have a terminal app somewhere, though the name varies. You can also just use VSCode’s Terminal.
Windows
If you are running Windows, you will need to install a few more things. Follow this guide for getting the “Windows Subsystem for Linux” installed on your machine and connected to VSCode. You will do everything through VSCode using the WSL extension.
A few notes:
- If your system supports it, go for WSL 2
- Under “Install your Linux distribution of choice”, I recommend that you choose Ubuntu 22.04 LTS (or something 22 LTS, which stands for “long term support”)
Package managers
Package managers make it easier to install and update software on your machine for the kinds of software that you will use in this class. Which package manager you use will depend on your system.
Windows
You should now have apt installed through WSL. Double check with which apt. If you don’t have it, you should definitely have apt-get, so check for that.
Linux
You should have apt or apt-get; double check with which.
macOS
Mac doesn’t have a proper built-in manager and so you should download Homebrew “The Missing Package Manager for MacOS” :). Follow the instructions on that page to install (if you don’t already have it).
Vi(m), Python3, Git
Now let’s make sure you have everything you need and install anything you are missing.
Open your Terminal VSCode and type:
which vi
Hopefully the answer will be /usr/bin/vi. The “which” command is asking where the vi command is located (yes, “where” would probably make more sense). Do it again with two more commands:
which python3
which git
If you don’t have either of those installed, you’ll need to install them using your package manager:
macOS
brew install git or brew install python3
WSL and Linux
sudo apt install git or sudo apt install python3 (or apt-get if that’s what you have.)
Git
You may already have used Git in previous classes, but I’m assuming that you haven’t. We’ll be using it for all assignments and labs.
If you already have a GitHub account and you want to use it for 361, great, just make sure that your Carleton email address is associated with it (Settings->Emails).
If you don’t have one or want a new one, go to https://github.com/ and use your Carleton email address to make it. I strongly recommend you pick a name that you’d be comfortable putting on a resume.
If you haven’t already, fill out this survey to let me know your GitHub username and tell me in class that you have added it so I can get you set up.
Starter Code
All the starter code for this class will be distributed through the 361-F26 GitHub Organization. If you filled out the GitHub survey before class, you may already see your individual repository on there. If so, you should click the green “Code” button:
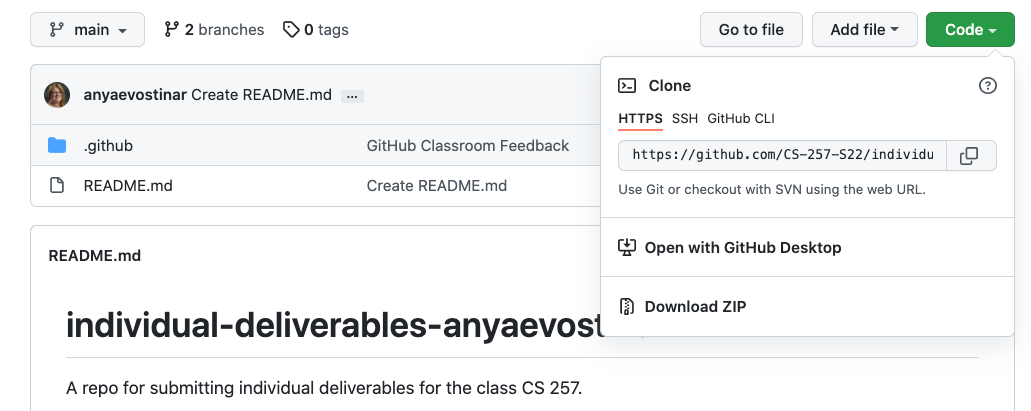
Make sure you see https:// as the first part of the URL. If you don’t, click on “Use HTTPS” in the right hand corner of that box.
Copy the URL (pressing the clipboard icon next to the URL should do the trick). Then, in your terminal, type the following:
git clone --recurse-submodules [URL]
replacing [URL] with the URL that you copied and pasted from GitHub. For instance, I’d do:
git clone --recurse-submodules https://github.com/361-F26/anyaevostinar-CA-Lab.git
Note that in this class you will always need to use the --recurse-submodules flag since I include two (large) libraries to do a lot of the heavy lifting of what we’ll be making. It will take a while to download these and that’s normal. You will likely at times forget the submodules flag. If so, you can get your submodules set up after the initial clone with git submodule update --init --recursive.
Setting up Emscripten
To handle the visualization in a web browser, we rely on the Emscripten library, which is emsdk in your starter code. For each new project, you need to set it up with the following commands:
cd emsdk
./emsdk install 3.1.49
./emsdk activate 3.1.49
cd ..
Each time that you want to build and run a web Gui, you’ll need to reload Emscripten into your path with the following commands. If you ever close your Terminal, you’ll need to redo this:
cd emsdk
source ./emsdk_env.sh
cd ..
Running the CA
With that all in place, the starter code is functional. Check it out with:
./compile-run.sh
You should be able to see a glider!
Starting with C++
Open up CAAnimate.cpp. This is where all the code that you need to worry about it located and we’ll use it to get an idea of C++’s differences.
Look through the file and find examples of the following syntax (and write it down on your worksheet):
- Defining a subclass
- Declaring variables and assigning them values right away
- Making a list of lists
- Defining methods/functions
- Writing a conditional statement
- Writing a for loop
More complex CAs
There are lots of variations on discrete CAs. You’re going to start off by exploring a couple of different rule sets and starting configuration (if the stater code structure is getting in your way, feel free to refactor it!).
HighLife Replicator
This CA is very similar to GoL, but it allows for an interesting “Replicator” pattern.
-
First, change the rules so that a dead cell becomes alive if it is 3 or 6 living neighbors and it stays alive if it is 2 or 3 living neighbors.
-
Then change the starting pattern to the following:
cells[3][1] = 1;
cells[4][1] = 1;
cells[5][1] = 1;

cells[2][2] = 1;
cells[5][2] = 1;

cells[1][3] = 1;
cells[5][3] = 1;

cells[1][4] = 1;
cells[4][4] = 1;

cells[1][5] = 1;
cells[2][5] = 1;
cells[3][5] = 1;
- Finally, this pattern needs more room to avoid destroying itself, so update the grid size to be 100 x 100. You’ll want to shrink the size of the rectangles to something closer to 5 or 8 to fit nicely on the screen. Then execute
./compile_run.shagain to see the replicator pattern!
Brian’s Brain
We don’t have to stick with only two states! A classic three-state CA is Brian’s Brain, which simulates action potentials or chemical waves in the brain with a cool-down period after a cell activates.
Make the following updates:
- Change
1to be a blue filled square for “on” - Change
2to be a red filled square for “dying” - Update the transition rules to be:
- A cell moves from “off” to “on” if it has 2 “on” neighbors
- A cell moves from “on” to “dying” in the next time step no matter what
- A “dying” cell becomes “off” in the next time step no matter what
A lot of different starting patterns lead to interesting things in this setup, so it’s a good time to learn about Empirical’s random number generator.
- Create an instance of the random number generator with:
emp::Random random; // emp is the namespace, Random is the class, random is your object - Then instead of hard-coding a starting pattern, use nested for-loops to loop over your cells and give them each a 25% chance of starting “on”. Here is a demo of using the random number generator:
if (random.P(0.25)) { // 25% chance of this code executing } - Compile and run a few times to see what you get! Feel free to play around with how many start on.
Submission
You aren’t required to submit labs in this class, but you can for an extra engagement credit. Complete the implemention of Brian’s Brain and then do the following commands to push to GitHub:
git add CAAnimate.cpp
git commit -m "finished brain"
git push
Extra
Try out implementing more variations of CA!